There’s something timeless about the Black Forest Cake, rich chocolate layers, cherries bursting with flavor, and clouds of whipped cream that make every bite feel like a celebration. The first time I made this cake, it wasn’t for a special event. It was a quiet Sunday afternoon in my Santa Cruz kitchen. I wanted something comforting, something that reminded me of family dinners growing up.
This cake does exactly that. It’s not just a dessert; it’s a story baked in layers. Each one holds a bit of sweetness, a little tartness, and a whole lot of heart. When my friend from Germany took her first bite, she smiled and said, “This tastes like home.” That’s when I knew this recipe wasn’t just good, it was meaningful.
If you’ve ever enjoyed my Chocolate Cake Recipe or the fluffy Easy Vanilla Cupcakes, you’ll love this one. The Black Forest Cake looks elegant, but it’s surprisingly simple once you know the rhythm, mix, bake, layer, and top with cream and cherries.
A Slice of German Tradition
The Black Forest Cake, known as Schwarzwälder Kirschtorte in Germany, comes from the country’s Black Forest region, a place famous for dark cherries and deep chocolate flavors. Traditionally, it’s made with a cherry liqueur called Kirschwasser, but I’ve adapted it into a family-friendly version that’s just as delicious.
The balance is what makes it special. Moist chocolate sponge meets sweet-tart cherries, all wrapped in soft whipped cream. It’s indulgent without being heavy. If you like European classics such as my German Apple Cake, this recipe is the perfect addition to your dessert rotation.
Table of Contents
Why This Black Forest Cake Works Every Time
A successful Black Forest Cake depends on three simple things: flavor balance, texture, and freshness. Here’s how this version nails all three:
- The chocolate cake base is incredibly moist while still sturdy enough to slice cleanly and hold its shape.
- The cherry filling is homemade, not canned, giving it that bright, real fruit flavor.
- The whipped cream frosting is light and fluffy, never too sweet.
The steps are approachable, even for beginners. Like my Carrot Cake Recipe or Red Velvet Cake, this dessert proves baking can be joyful and stress-free.
Print
Black Forest Cake: 5-Step Guide to Easy Classic German Recipe
- Total Time: 2 hrs 55 mins
- Yield: 1 (9-inch) cake
- Diet: Vegetarian
Description
- A moist and fluffy Black Forest Cake made with layers of rich chocolate sponge, sweet cherry filling, and whipped cream frosting. A classic German dessert that’s surprisingly simple to bake at home.
Ingredients
- Cake Layers:
- 2 ⅛ cups all-purpose flour
- 2 cups white sugar
- ¾ cup unsweetened cocoa powder
- 1½ teaspoons baking powder
- ¾ teaspoon baking soda
- ¾ teaspoon salt
- 3 large eggs
- 1 cup milk
- ½ cup vegetable oil
- 1 tablespoon vanilla extract
- Cherry Filling:
- 2 (20 oz) cans pitted sour cherries
- 1 cup white sugar
- ¼ cup cornstarch
- 1 teaspoon vanilla extract
- Whipped Cream Frosting:
- 3 cups heavy whipping cream
- ⅓ cup confectioners’ sugar
Instructions
- Preheat the oven to 350°F (175°C). Grease and line two 9-inch cake pans.
- Whisk flour, sugar, cocoa, baking powder, baking soda, and salt in a large bowl.
- Add eggs, milk, oil, and vanilla; beat until smooth. Pour into pans.
- Bake for 35 minutes or until a toothpick comes out clean. Cool completely.
- For cherry filling: combine cherries, sugar, cornstarch, and juice; cook until thick.
- Whip cream and sugar until stiff peaks form.
- Split each cake layer; fill and frost with whipped cream and cherries.
- Top with extra cream, cherries, and chocolate shavings.
Notes
- You can make the cake layers a day ahead and assemble before serving.
- For a family-friendly version, skip the cherry liqueur and use cherry juice instead.
- Prep Time: 50 mins
- Cook Time: 35 mins
- Category: Dessert
- Method: Baking
- Cuisine: German
Ingredients & Step-by-Step Preparation for Black Forest Cake
Baking a Black Forest Cake from scratch might sound complicated, but this version keeps it approachable and fun. Every part of the recipe, from the moist chocolate sponge to the creamy whipped topping, is designed for home bakers who want a show-stopping dessert without the stress.
The Ingredients
A true Black Forest Cake has three components: rich chocolate cake layers, sweet-tart cherry filling, and airy whipped cream frosting. Here’s everything you need to gather before you start:
For the Cake Layers
- 2 ⅛ cups all-purpose flour
- 2 cups white sugar
- ¾ cup unsweetened cocoa powder
- 1½ teaspoons baking powder
- ¾ teaspoon baking soda
- ¾ teaspoon salt
- 3 large eggs
- 1 cup milk
- ½ cup vegetable oil
- 1 tablespoon vanilla extract
For the Cherry Filling
- 2 cans (20 ounces each) pitted sour cherries
- 1 cup white sugar
- ¼ cup cornstarch
- 1 teaspoon vanilla extract
For the Whipped Cream Frosting
- 3 cups heavy whipping cream
- ⅓ cup confectioners’ sugar
If you enjoy easy cakes with everyday ingredients, you’ll also love my Lemon Blueberry Cake and Banana Cake Recipe. Both use similar pantry staples and simple techniques.
Step 1: Prepare the Pans and Oven
Start by preheating your oven to 350°F (175°C). Grease and flour two 9-inch round pans, then line the bottoms with parchment paper. This helps the cakes release cleanly once baked. A quick tip, make sure your eggs and milk are at room temperature to help the batter mix smoothly.
Step 2: Mix the Batter
In a large bowl, whisk the flour, sugar, cocoa, baking powder, baking soda, and salt until combined. Add the eggs, milk, oil, and vanilla extract. Beat with an electric mixer until the batter is smooth and glossy. Pour evenly into the prepared pans. The batter should feel rich and velvety, almost like pudding.
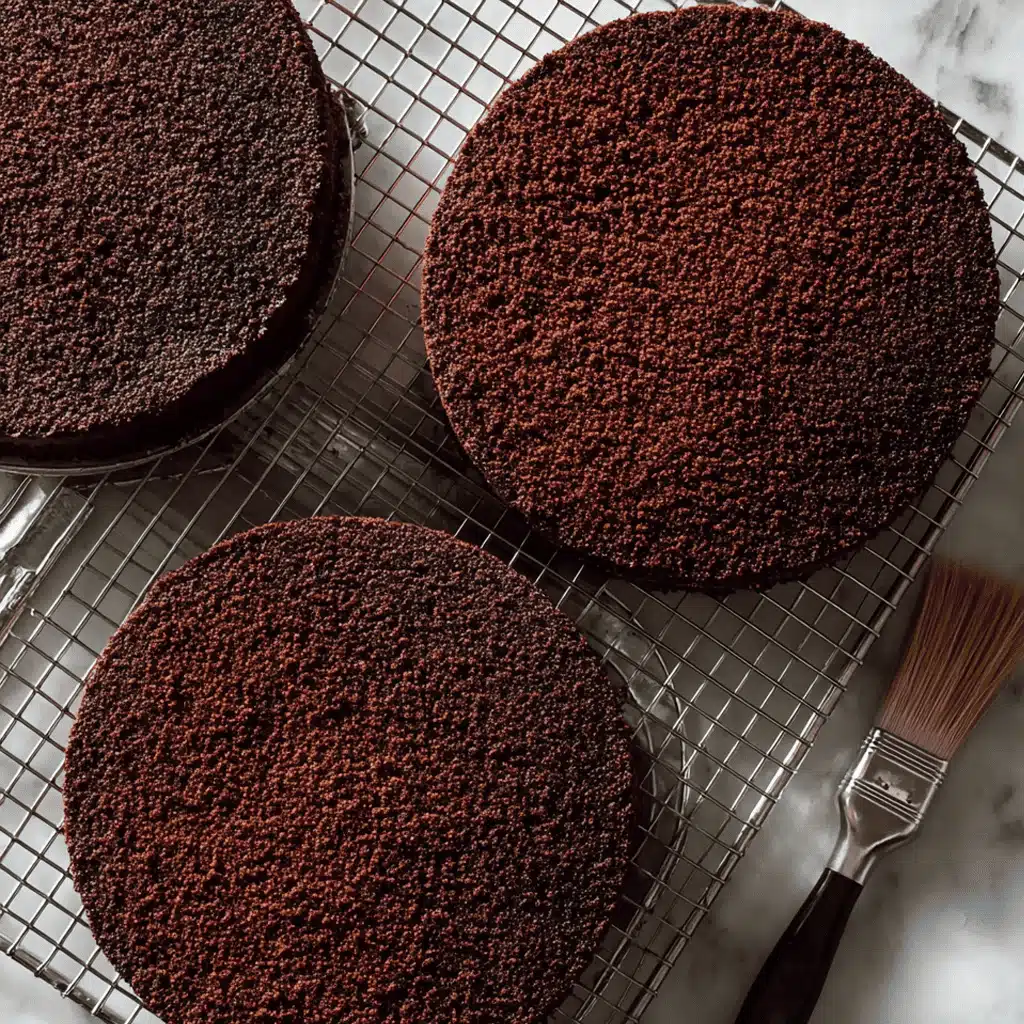
Step 3: Bake and Cool
Bake the cakes for about 35 minutes, or until a toothpick inserted into the center comes out clean. After baking, let the cakes sit in their pans for 10 minutes. Carefully place them on wire racks afterward and allow them to cool all the way through. Cooling fully is key, assembling while warm will melt the whipped cream later.
Step 4: Make the Cherry Filling
While the cakes bake, drain your cherries and reserve half a cup of the juice. In a medium saucepan, mix the reserved cherry juice with the cherries, sugar, and cornstarch. Cook over low heat, stirring nonstop, until the mixture becomes thick and glossy. Add the vanilla extract, remove from heat, and let it cool to room temperature before chilling it in the refrigerator.
If you prefer fruity, cool desserts, you’ll love the balance of sweet and tart in my No-Bake Cheesecake.
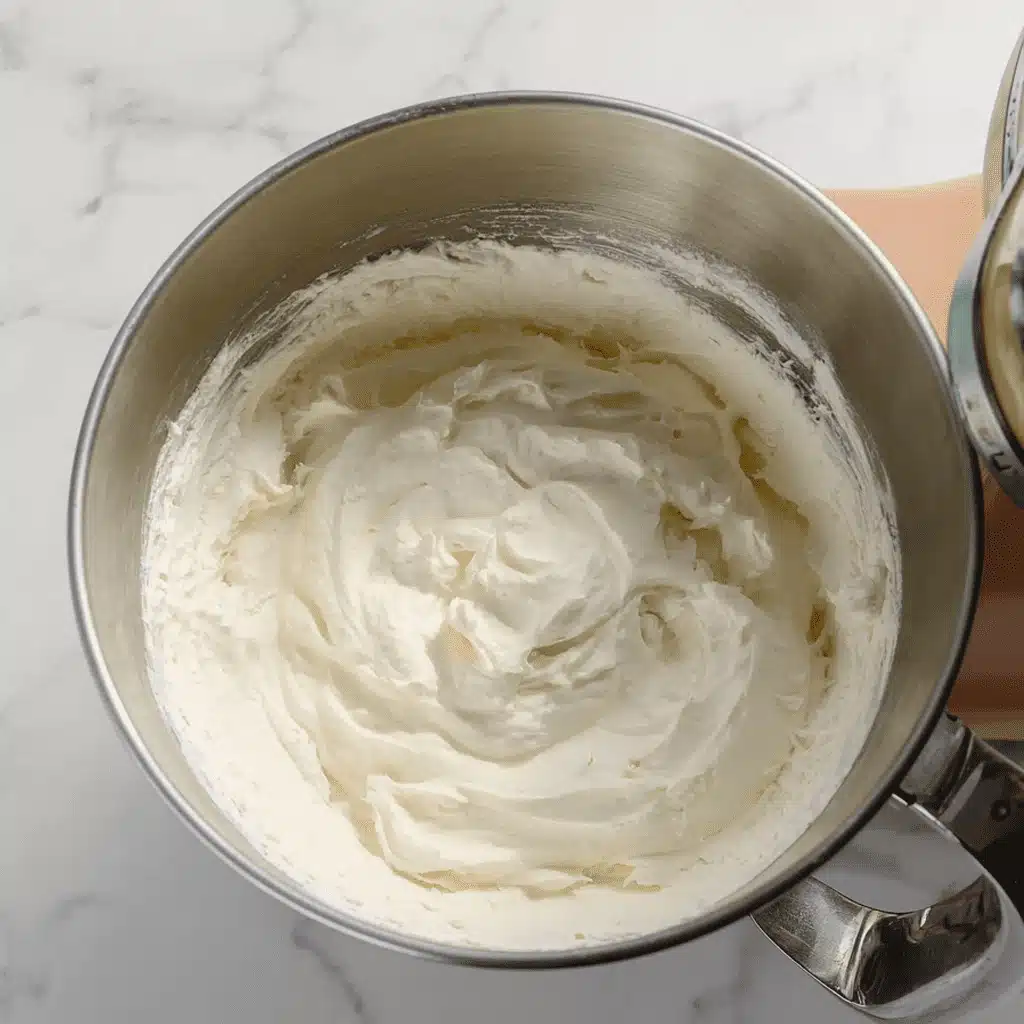
Step 5: Whip the Cream
Place a chilled bowl and beaters in the refrigerator for a few minutes. Pour in the heavy cream and confectioners’ sugar, then beat on high speed until stiff peaks form. The cream should be thick enough to hold its shape but still silky.
Step 6: Assemble the Cake
Once everything is cool, slice each cake layer in half horizontally to make four thin rounds. Place one layer on a serving plate, spread with whipped cream, and spoon cherry filling on top. Repeat with the next two layers, then frost the top and sides of the cake with more whipped cream.
For the final touch, add extra cherries and chocolate shavings. If you’re looking for decorating inspiration, check out my Red Velvet Cake, the same simple piping tricks work beautifully here.
Step 7: Chill and Serve
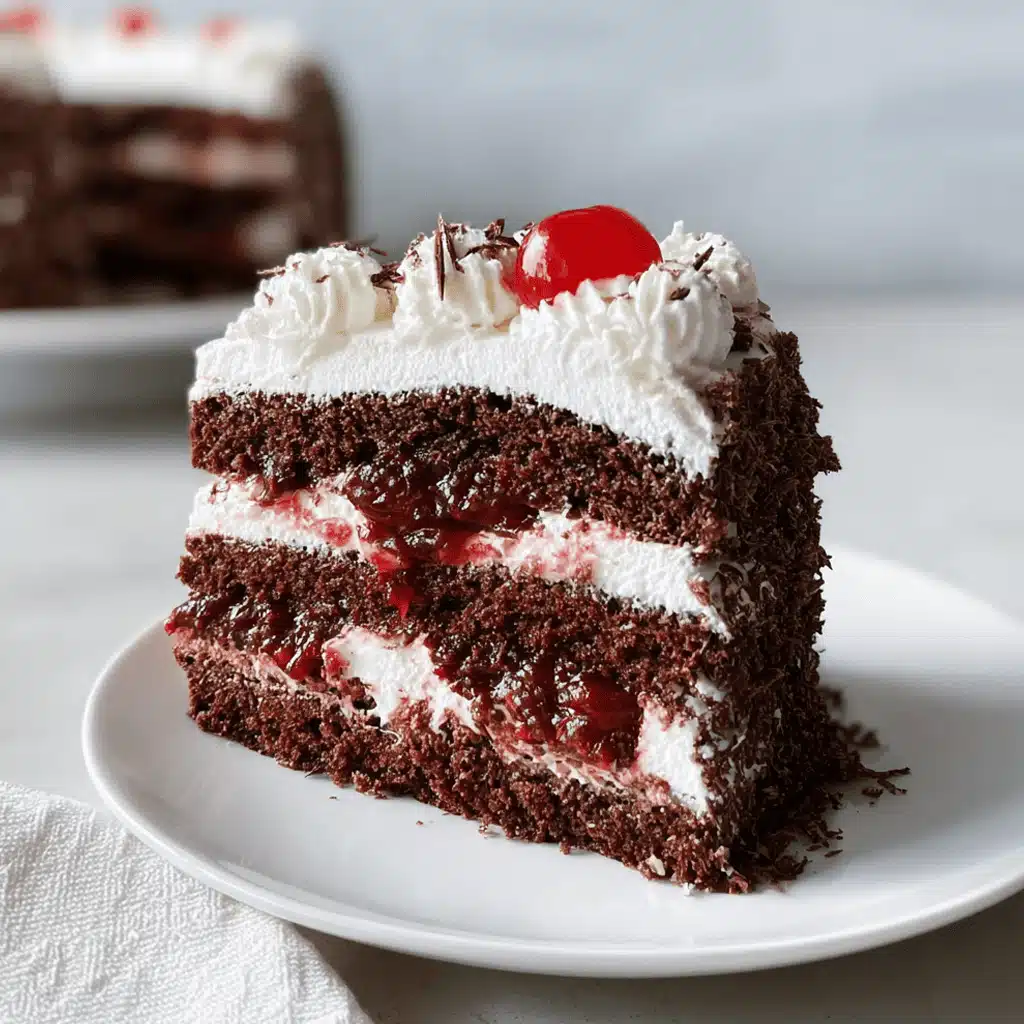
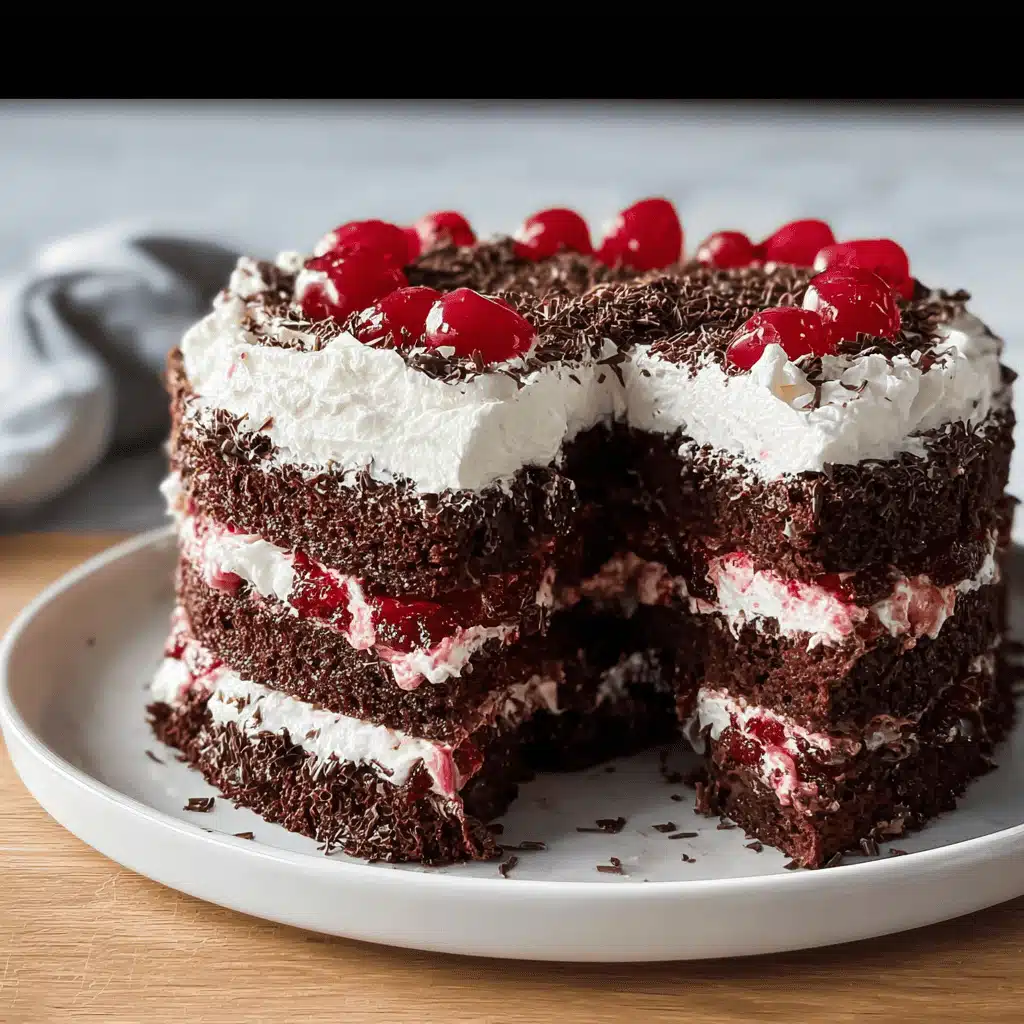
Refrigerate the finished cake for at least one hour before serving. This helps the layers set and the flavors meld together. When sliced, each layer should reveal that signature contrast, dark chocolate, creamy white frosting, and bright red cherries.
Serve it chilled, with a side of coffee or, if you’re feeling fancy, a drizzle of warm chocolate syrup. For another crowd-pleasing option, try my Carrot Cake Recipe next time you’re baking for a group.
Assembly Tips, Decoration & Creative Variations
Now that your cakes are baked, cherries cooled, and cream whipped, it’s time for the fun part, assembling and decorating your Black Forest Cake. This step transforms simple layers into a bakery-style masterpiece that looks as incredible as it tastes.
How to Assemble Like a Pro
Begin by trimming the tops of each cake layer with a serrated knife to create an even surface. This helps them stack evenly without tilting. Place one layer on your serving plate and spread a generous amount of whipped cream, followed by a spoonful of cherry filling. Repeat until you’ve built three full layers, reserving the top for decoration.
Gently frost the sides and top with the remaining whipped cream. Don’t worry if it’s not perfectly smooth, a rustic finish gives the cake charm. For that classic look, press chocolate shavings along the sides and top. You can make them by running a vegetable peeler along a chocolate bar.
If you’ve ever admired the finish on my German Apple Cake, the same principle applies here: let the natural beauty of your ingredients shine rather than aiming for perfection.
Decorating and Finishing Touches
A true Black Forest Cake always features a swirl of whipped cream and a bright cherry on top of each slice. You can use a piping bag with a star tip to create clean, beautiful dollops around the top edge. Arrange the remaining cherries in the center for that iconic presentation.
For a little extra elegance, drizzle melted chocolate over the top and let it gently run down the sides, the contrast of dark chocolate against white cream is irresistible.
If you’re looking to change things up, give these fun variations a try:
- Mini Black Forest Cups: Layer cake crumbs, cherries, and cream in small glasses for easy individual servings.
- Chocolate-Cherry Sheet Cake: Skip the layers and bake it in a sheet pan, perfect for parties.
- No-Alcohol Version: Stick to cherry juice instead of Kirschwasser for a family-friendly twist.
If you love creative spins like this, don’t miss my Sopapilla Cheesecake Pie, it’s another dessert that looks impressive but couldn’t be easier to make.
Tips for Perfect Results Every Time
- Cool Completely Before Frosting: Warm cakes can melt whipped cream, so patience here pays off.
- Chill Between Layers: If you’re baking in a warm kitchen, refrigerate the cake for 10 minutes between adding layers to keep everything firm.
- Stabilize the Whipped Cream: Add a tablespoon of cornstarch or instant pudding mix if you need the frosting to hold longer.
- Use Real Cherries When Possible: Fresh or frozen cherries give better texture and natural sweetness than canned ones.
When you’re done, stand back and admire your work, a homemade Black Forest Cake that tastes just as good as it looks. For more inspiration on timeless desserts, you might enjoy the buttery layers of my Blueberry Bread Recipe.
Once you’ve finished decorating your Black Forest Cake, the only thing left is to let it rest and serve it beautifully. The good news? This cake not only looks stunning but also keeps wonderfully when stored correctly.
Storing Your Black Forest Cake
The whipped cream frosting and cherry filling make this cake best kept chilled. Cover it loosely with plastic wrap or a cake dome and refrigerate for up to three days. The flavors actually improve as the layers rest, the cherries soak into the sponge, and the chocolate becomes even richer.
If you want to make it ahead, bake the cake layers one day early and store them wrapped at room temperature. Prepare the whipped cream and cherry topping fresh when you’re ready to assemble.
Leftover slices also freeze well. Just wrap them tightly and store them for up to a month. When ready to enjoy, thaw overnight in the fridge.
For other desserts that store beautifully, check out my Soft Christmas Cookies and Peanut Butter Bars. Both keep their texture for days and make excellent make-ahead treats.
Serving Suggestions
Serve your Black Forest Cake chilled but not icy. Let it sit at room temperature for about 10–15 minutes before slicing so the whipped cream softens slightly. A clean knife makes neat layers, wipe the blade between slices.
Pair with black coffee, a cappuccino, or even a scoop of vanilla ice cream for an indulgent dessert moment. If you’re serving guests, add a sprinkle of cocoa powder or shaved chocolate to the plate for a professional touch.
Conclusion
Baking a Black Forest Cake at home is about more than making dessert, it’s about creating a moment. Every bite combines deep chocolate, soft whipped cream, and juicy cherries that remind you why classic recipes never go out of style.
Whether it’s for a holiday, a birthday, or just a cozy afternoon in your kitchen, this cake turns simple ingredients into something memorable.
Now grab a fork, this Black Forest Cake deserves a celebration of its own.
Fore more recipes follow me on Facebook, Pinterest and Instagram
Frequently Asked Questions About Black Forest Cake
What’s the difference between chocolate cake and Black Forest Cake?
A classic chocolate cake focuses only on rich cocoa flavor, while Black Forest Cake adds cherry filling and whipped cream, creating a balance of tart, sweet, and creamy textures.
What is a Black Forest Cake made of?
This cake includes three key components: chocolate sponge cake, cherry filling, and whipped cream frosting. Traditional versions also include cherry liqueur, but this recipe uses cherry juice for an alcohol-free version.
What is the German law on Black Forest Cake?
In Germany, labeling laws state that to be called Schwarzwälder Kirschtorte, a cake must contain real Kirschwasser (cherry brandy). However, home bakers and international versions often skip the alcohol while keeping the same flavor profile.
What is the primary flavor of a Black Forest Cake?
The dominant flavor is chocolate, complemented by the brightness of cherries and the lightness of whipped cream. Together, they create a flavor that’s rich but refreshing, the perfect balance in a dessert.