Hawaiian Butter Mochi is one of those desserts that brings instant warmth to your kitchen. With its rich buttery flavor, coconut aroma, and signature chewy texture, this island favorite perfectly blends Japanese mochi with a Hawaiian twist. In this article, we’ll cover everything you need to know about making Hawaiian Butter Mochi at home, from simple ingredients to expert tips that guarantee that irresistible golden crust and soft, bouncy middle. We’ll also share answers to common questions about what makes butter mochi unique, why it’s so loved in Hawaii, and how to store it for lasting freshness.

The Heart of Hawaiian Butter Mochi
A Sweet Memory from the Islands
Hi there! I’m April Marlowe, coming to you from my sunny kitchen in Santa Cruz, California. The first time I tasted Hawaiian Butter Mochi, I was visiting a friend from Oahu who handed me a small, golden square and said, “You have to try this, it’s Hawaii’s best-kept secret.” One bite and I understood why. The soft, chewy texture was unlike anything else, buttery, slightly sweet, with a hint of coconut that lingered like a tropical breeze. It reminded me of the kind of homey desserts that don’t need frosting or fuss, just love and good ingredients.
Growing up, my dad used to turn pantry scraps into dessert magic, so when I learned that Hawaiian Butter Mochi came from that same make-it-work spirit, a blend of Asian and island flavors, I knew it belonged in my kitchen. Now, I bake it for friends when I want to bring a little sunshine to the table. It’s the kind of dessert that makes people pause after the first bite and immediately ask, “Wow, what is this?”
If you love tropical flavors, you’ll also fall for the cozy layers in my German Apple Cake and the creamy goodness of Jam Filled Butter Cookies.
Why Hawaiian Butter Mochi Works Every Time
At its core, Hawaiian Butter Mochi is comfort in a pan. Unlike traditional Japanese mochi that’s steamed and pounded, this version is baked until golden on top and delightfully chewy inside. The secret lies in mochiko flour (sweet rice flour), which gives it its stretchy bite, and coconut, which adds depth and richness. Melted butter and eggs bind everything together for that custardy middle we all crave.
The result is a dessert that’s rich yet not heavy, sweet but not cloying. You can enjoy it warm, room temperature, or chilled, it’s perfect for potlucks, parties, or quiet nights when you just want something satisfying without spending hours in the kitchen.
When you cut into a batch, each square holds that soft, glutinous chew balanced by a caramelized crust. It’s that contrast that makes it unforgettable. If you’re a fan of moist desserts like my White Chocolate Cranberry Cookies, you’ll love how butter mochi straddles the line between cake and candy, but it’s in a category all its own.
Print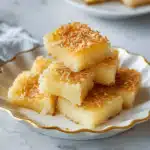
Hawaiian Butter Mochi Recipe: Easy, Chewy Island Dessert That Everyone Loves
- Total Time: 1 hr 15 mins
- Yield: 1 (9×13-inch) pan
- Diet: Vegetarian
Description
- A chewy, buttery Hawaiian dessert made with mochiko flour and coconut, baked to golden perfection.
Ingredients
- 1 pound mochiko (glutinous rice flour)
- 2 ½ cups white sugar
- 1 teaspoon baking powder
- ½ cup butter, melted
- 3 cups whole milk
- 5 large eggs
- 1 teaspoon vanilla extract
- 1 cup sweetened, flaked coconut
Instructions
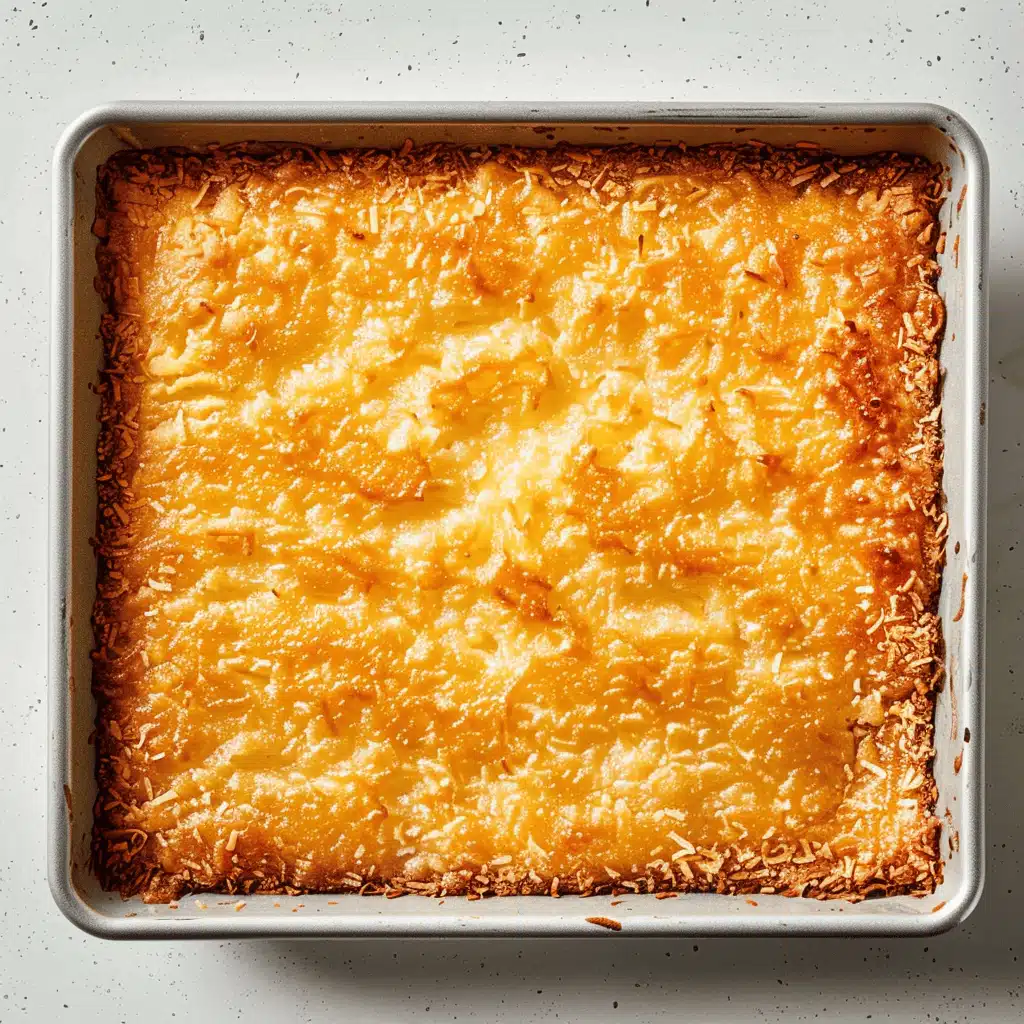
- Preheat oven to 350°F. Grease a 9×13-inch baking pan.
- Whisk eggs, vanilla, and milk in a bowl.
- In a large bowl, mix mochiko, sugar, and baking powder.
- Combine wet and dry mixtures; stir in melted butter.
- Fold in coconut flakes until evenly distributed.
- Pour batter into pan and bake for 1 hour until golden brown.
- Cool completely before cutting into squares.
Notes
- The flavor deepens as it cools. Store at room temperature up to 2 days or refrigerate for longer freshness.
- Prep Time: 15 mins
- Cook Time: 1 hr
- Category: Dessert
- Method: Baking
- Cuisine: Hawaiian
Table of Contents
The Ingredients That Make Hawaiian Butter Mochi Irresistible
The Magic Behind Every Ingredient
The beauty of Hawaiian Butter Mochi lies in its simplicity. You don’t need exotic ingredients, just a few pantry staples that come together to create something extraordinary. Each one plays a key role in achieving that signature chewy, custard-like texture and deep golden crust.
- Mochiko (Sweet Rice Flour): This is the soul of butter mochi. Unlike regular rice flour, mochiko is made from glutinous rice, giving the dessert its stretchy, sticky bite. It’s commonly sold at Asian grocery stores and widely available online.
- Butter: Melted butter adds richness, helps create the browned edges, and brings balance to the sweetness. Always use real unsalted butter for the best flavor.
- Coconut: Sweetened, flaked coconut brings a tropical note and adds a gentle chew that complements the mochi base beautifully.
- Eggs: Five large eggs provide structure and that smooth, custard-like interior. Whisk them gently, overbeating can create air pockets that affect the texture.
- Milk: Whole milk keeps the batter silky and provides moisture. Some home bakers like to mix in a splash of coconut milk for extra flavor, but plain milk works wonderfully on its own.
- Vanilla Extract: A touch of vanilla rounds out the buttery flavor and ties the coconut sweetness together.
- Sugar and Baking Powder: Sugar sweetens evenly through the dense batter, while baking powder helps lift the mochi just enough to stay soft instead of gummy.
If you enjoy recipes that use simple ingredients with big results, you’ll also love my Crustless Cranberry Pie and Pineapple Upside Down Cake. Both share that same easy, home-baked charm that makes people think you spent all day in the kitchen, even when you didn’t.
Step-by-Step Technique for Perfect Texture
Perfect Hawaiian Butter Mochi isn’t just about the ingredients, it’s about how you combine them. Start by preheating your oven to 350°F and greasing a 9×13-inch baking pan. In one bowl, whisk your eggs, vanilla, and milk until smooth. In another, stir together mochiko, sugar, and baking powder.
Gradually add the wet ingredients to the dry mixture, whisking until the batter looks silky and lump-free. Then pour in your melted butter and stir until it disappears into the glossy batter. Fold in the flaked coconut last, so it’s evenly distributed.
Pour everything into the prepared pan and bake for about an hour, you’ll know it’s ready when the top turns golden and slightly crisp around the edges. Let it cool completely; this part is crucial. As it sets, the butter mochi firms up and develops that iconic chewy texture. Use a greased knife to cut clean squares once cooled.
Mastering Texture and Troubleshooting Hawaiian Butter Mochi
Secrets to That Perfect Chewy Bite
The hallmark of Hawaiian Butter Mochi is its distinctive chew, soft, springy, and just a little sticky. Getting that texture right comes down to a few simple but crucial techniques.
First, always measure your mochiko flour carefully. Too much, and your mochi turns dense and rubbery; too little, and it becomes soggy in the center. Level each cup instead of packing it in. Next, mix the batter just until smooth. Overmixing incorporates air, which leads to bubbles and uneven texture.
Another key secret? Let your butter mochi rest after baking. It might be tempting to cut it right away, but as it cools, the rice flour fully sets and becomes that perfectly bouncy texture we all love. I usually let mine sit on a wire rack for at least two hours before slicing.
For a dessert that’s equally comforting and foolproof, you might also enjoy my White Chocolate Raspberry Cheesecake or 4-Ingredient Keto Peanut Butter Cookies. Both desserts share that same balance of rich flavor and simple preparation that defines great home baking.
Common Mistakes and How to Fix Them
Even the most experienced home bakers can run into a few hiccups when making Hawaiian Butter Mochi. Here’s how to troubleshoot them so every batch turns out beautifully.
- Too soft or mushy: The mochi likely wasn’t baked long enough. Each oven runs differently, so if it’s still jiggly in the middle after an hour, give it an extra 10 minutes.
- Dry or crumbly: Overbaking is the culprit here. The top should be golden, not brown. Pull it out as soon as the edges set and the center looks slightly glossy.
- Not chewy enough: Double-check that you used mochiko flour, not regular rice flour. Only glutinous rice flour creates that signature bounce.
- Sticky knife when cutting: Lightly grease your knife with butter or cooking spray before slicing, and clean it between cuts for sharp, tidy squares.
If you’re craving another chewy dessert that never fails to impress, try my Galaktoboureko Recipe or Bougatsa Recipe. Both share that same soft texture that makes them irresistible the next day, too.
The truth is, once you make butter mochi a few times, you start to feel its rhythm, how thick the batter should be, how the top caramelizes just right, and how the edges pull slightly away from the pan when it’s ready. It’s one of those recipes that rewards practice, not perfection.
How to Serve Hawaiian Butter Mochi the Right Way
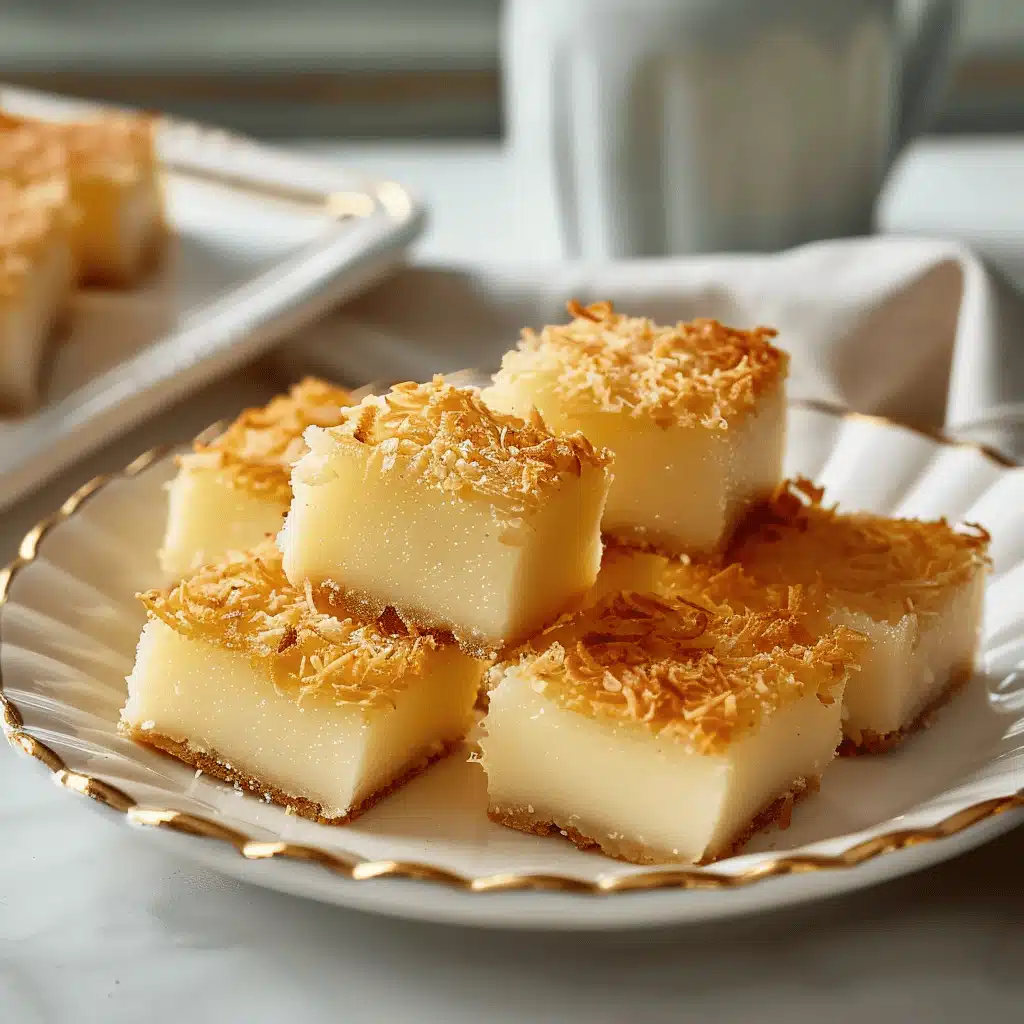
Once your Hawaiian Butter Mochi cools, it’s time for the best part, slicing and serving. Wait until it’s completely set, then use a greased, sharp knife to cut even squares. The chewy, buttery texture and golden crust are most delicious at room temperature.
You can serve butter mochi on its own, dusted with shredded coconut, or next to a scoop of vanilla or pineapple ice cream for an extra island touch. It’s a dessert that feels equally right at a backyard barbecue or a cozy night at home.
Because it’s sturdy and easy to transport, butter mochi is one of Hawaii’s favorite potluck desserts. Wrap individual squares in parchment paper for a grab-and-go treat that stays soft and flavorful.
How to Store Hawaiian Butter Mochi
The key to keeping Hawaiian Butter Mochi soft and chewy is storing it correctly. Once the mochi has cooled, wrap the pan tightly in plastic wrap or transfer the squares to an airtight container.
You can store it at room temperature for up to two days, or refrigerate for up to five days. Before serving, let refrigerated mochi sit on the counter for about 15 minutes so it regains its chewy texture.
If you want to keep it longer, wrap each piece individually and freeze for up to two months. To serve, just thaw overnight in the fridge, no reheating needed. The slightly chilled texture is wonderfully chewy.
For more make-ahead desserts that stay fresh for days, try my Easy Moist Chocolate Cupcakes or Easy Oreo Truffles Recipe. Both taste even better the day after baking.
Conclusion
Hawaiian Butter Mochi is more than just a dessert, it’s a celebration of comfort, community, and flavor. From its chewy coconut base to its buttery crust, every square feels like sunshine baked into a pan.
Whether you’re baking it for a family gathering, a school event, or just because, this easy treat never fails to impress. With simple ingredients and a few kitchen staples, you can bring a taste of Hawaii right to your table.
From my sunny Santa Cruz kitchen to yours, I hope this recipe brings that same “wow” moment I felt the first time I tried it, sweet, golden, and perfectly chewy.
Fore more recipes follow me on Facebook, Pinterest and Instagram
FAQs About Hawaiian Butter Mochi
What is Hawaiian butter mochi made of?
Hawaiian butter mochi is made with mochiko (sweet rice flour), sugar, butter, milk, eggs, baking powder, and coconut. These ingredients combine to create a chewy, custard-like texture with a buttery, golden crust.
Is butter mochi the same as mochi?
Not exactly. Traditional mochi is steamed and pounded, while Hawaiian Butter Mochi is baked. The baked version develops a cake-like top and dense, chewy center, a true fusion of Japanese and Hawaiian flavors.
Why is my butter mochi not chewy?
The most common reason is using the wrong flour. Always use glutinous rice flour labeled as mochiko. Also, avoid overbaking; once the edges turn golden and the center looks glossy, it’s ready.
Do you refrigerate Hawaiian butter mochi?
Yes, but only if storing for several days. Keep it at room temperature for short-term freshness or refrigerate in an airtight container for up to five days. Let it warm slightly before serving for the best chew.